


Setting up Active Directory on Windows Server 2025 isn’t complicated, but people keep fumbling the same steps: wrong static IP before promotion, wrong DNS pointing after, or forgetting to verify replication before adding clients. I ran through this whole setup on Hyper-V on my Windows 11 machine, using a Windows Server 2025 VM as the domain controller and a separate Windows 11 guest VM as the client. The domain I’m building: sysprobs.local. Let me walk you through exactly what I did.
Quick Answer: To set up Active Directory on Windows Server 2025, assign a static IP to your server, install the AD DS role via Server Manager, run the domain promotion wizard to create a new forest (e.g., sysprobs.local), reboot, then join your client machines to the domain. The whole process takes under 30 minutes on a clean install.
What Active Directory Is Right Now
Active Directory Domain Services (AD DS) is still the backbone of most on-premises Windows environments. Yes, Azure AD (now Microsoft Entra ID) exists, but plenty of home labs, SMBs, and enterprise branches still run a local AD for GPOs, internal DNS, file share permissions, and domain-joined devices. Windows Server 2025 ships with AD DS fully supported, and the setup process got a bit cleaner compared to Server 2019.
The role-based installation flow through Server Manager hasn’t changed drastically, but the underlying OS improvements (like tighter SMB security defaults and improved Kerberos support) make Server 2025 a solid choice for a new domain controller.
My Lab Setup on Hyper-V
Before touching anything, here’s what I had running on my Windows 11 Hyper-V host:
| VM | OS | Role | IP Address |
|---|---|---|---|
| SRV-SYSPROBS | Windows Server 2025 | Domain Controller | 192.168.1.10 |
| CLIENT-01 | Windows 11 | Domain Member | DHCP (later joined) |
Both VMs are on the same internal Hyper-V virtual switch. The server VM had 4GB RAM and 2 vCPUs, which is more than enough for a lab DC.
Step 1: Set a Static IP on the Server
This is the step people skip and regret later. A domain controller needs a fixed IP. If it changes, DNS breaks, Kerberos breaks, and domain joins start failing with cryptic errors.
On the Windows Server 2025 VM, open Settings > Network & Internet > Ethernet > Edit IP assignment (or go through the classic Control Panel if you prefer).
Set the following:
- IP address: 192.168.1.10
- Subnet mask: 255.255.255.0
- Default gateway: 192.168.1.1
- Preferred DNS: 127.0.0.1 (point to itself, this becomes critical after AD DS install)
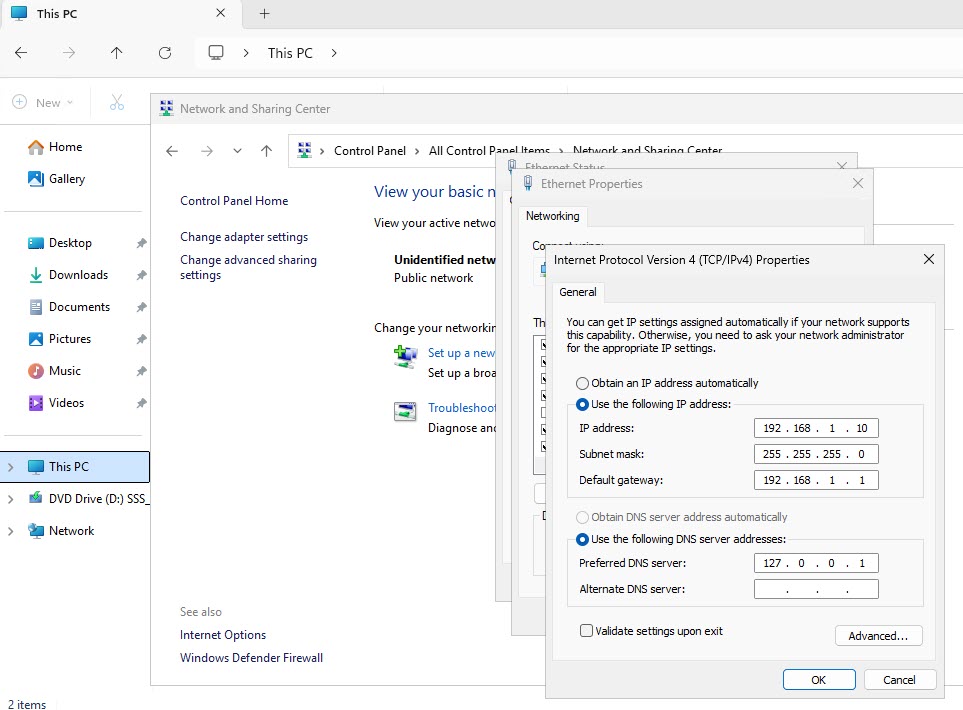
After setting it, open Command Prompt and run:
textipconfig /allConfirm the IP shows correctly. Also ping your gateway to make sure you have connectivity.
Step 2: Rename the Server
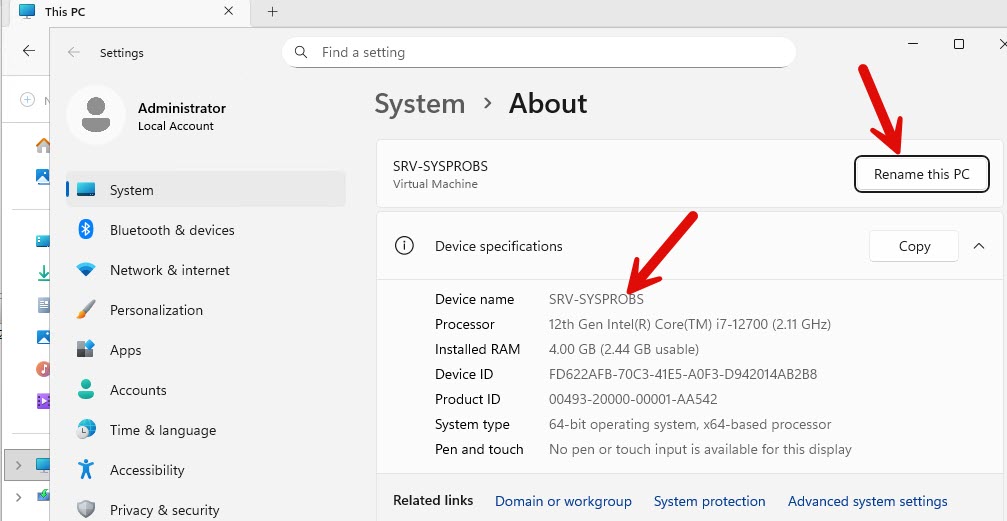
I always rename the server before promoting it. Changing the hostname after AD DS is installed is a pain and requires extra steps.
Right-click This PC > Properties > Rename this PC. I named mine SRV-SYSPROBS. Reboot when prompted.
Step 3: Install the AD DS Role
Open Server Manager. On the dashboard, click Add roles and features.
Walk through the wizard:
- Installation Type: Role-based or feature-based installation
- Server Selection: Select your server (SRV-SYSPROBS)
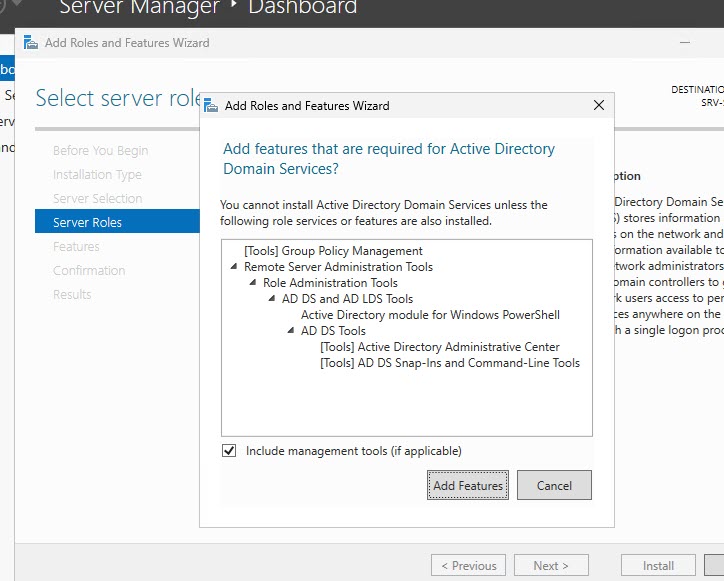
- Server Roles: Check Active Directory Domain Services
When you check AD DS, a pop-up will ask to add required features (like Group Policy Management and remote tools). Click Add Features.
- Click Next through Features and AD DS info pages
- Confirmation page: Click Install
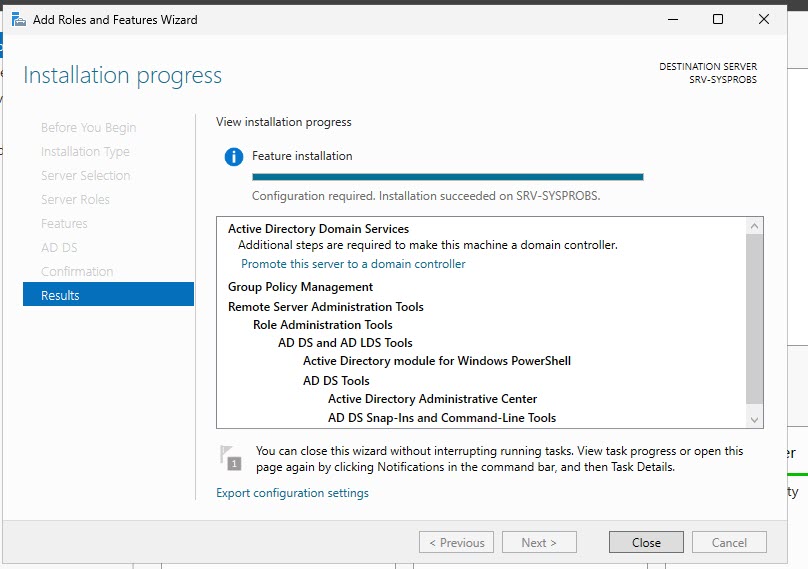
The installation takes a few minutes. Don’t close Server Manager, you’ll see the progress bar. When it finishes, you’ll notice a yellow warning flag appear on the Server Manager toolbar. That’s the post-deployment configuration notification.
Step 4: Promote the Server to a Domain Controller
Click that yellow flag in Server Manager. You’ll see the option: Promote this server to a domain controller. Click it.
The Active Directory Domain Services Configuration Wizard opens.
Deployment Configuration
Select Add a new forest since we’re starting from scratch. Enter your root domain name:
textsysprobs.local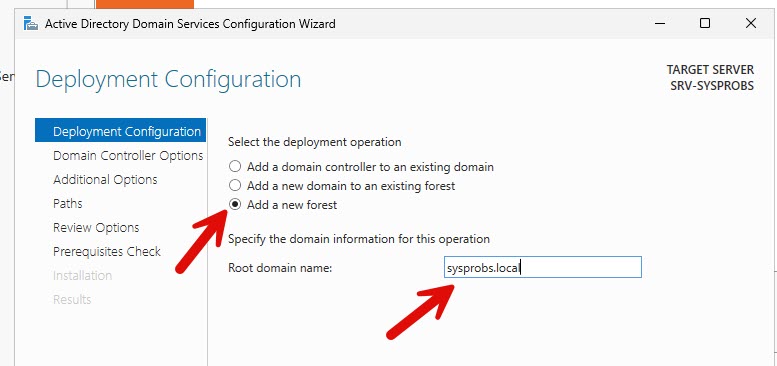
Domain Controller Options
- Forest functional level: Windows Server 2016 (or 2025 if you want the latest, I kept 2016 for broader compatibility in lab scenarios)
- Domain functional level: Windows Server 2016
- DNS server: Checked ✅
- Global Catalog (GC): Checked ✅
- DSRM Password: Set a strong password here. Write it down. You’ll need it if you ever need to restore AD from backup.
DNS Options
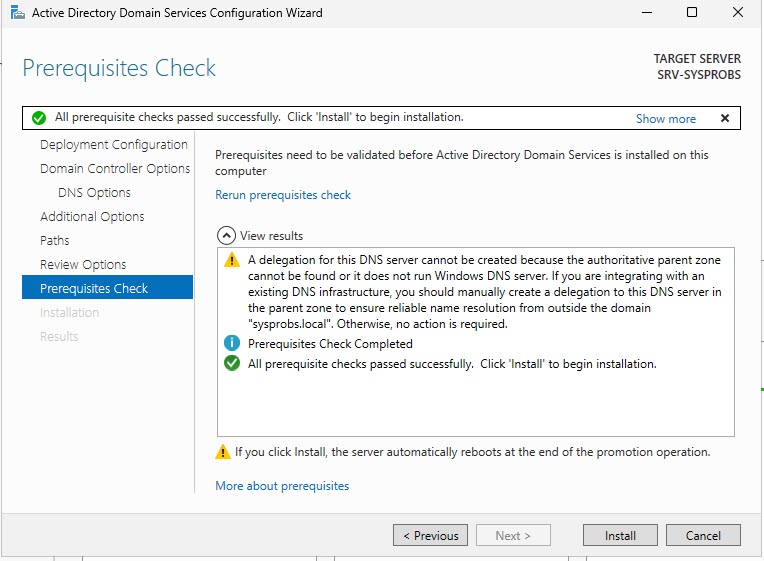
You’ll likely see a warning about DNS delegation, something like “A delegation for this DNS server cannot be created.” In a brand-new lab, this is completely normal. Ignore it.
Additional Options
The NetBIOS domain name will auto-populate as SYSPROBS. Leave it.
Paths
Leave the default paths for the AD database, log files, and SYSVOL folder unless you have a specific reason to change them. For a lab, defaults are fine.
textDatabase folder: C:\Windows\NTDS
Log files folder: C:\Windows\NTDS
SYSVOL folder: C:\Windows\SYSVOL
Review Options and Prerequisites Check
The wizard runs a prerequisites check. You’ll likely see some warnings (like the strong password policy warning), those are informational, not blockers. As long as there are no red errors, click Install.
The server will automatically reboot when promotion completes.
Step 5: Verify the Domain Controller Is Working
After the reboot, log in with:
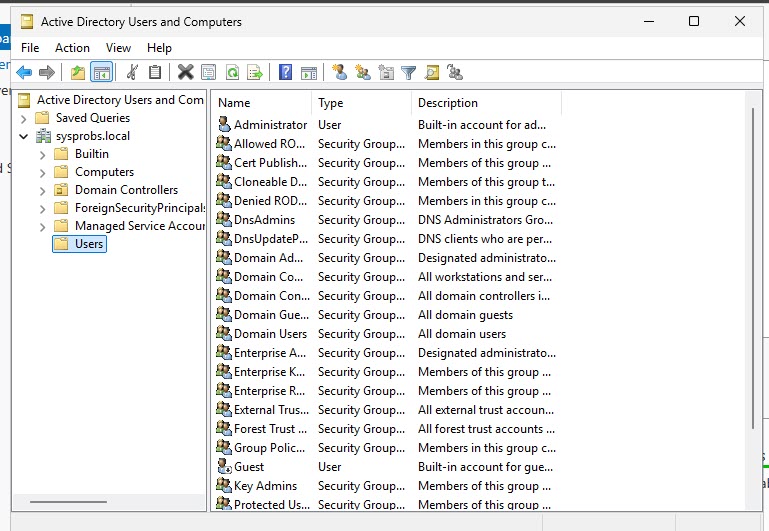
textSYSPROBS\AdministratorOpen Server Manager > Tools > Active Directory Users and Computers. You should see the sysprobs.local domain tree on the left.
Now verify DNS. Open Server Manager > Tools > DNS. Expand your server and look for Forward Lookup Zones > sysprobs.local. You should see SOA, NS, and A records for the DC.
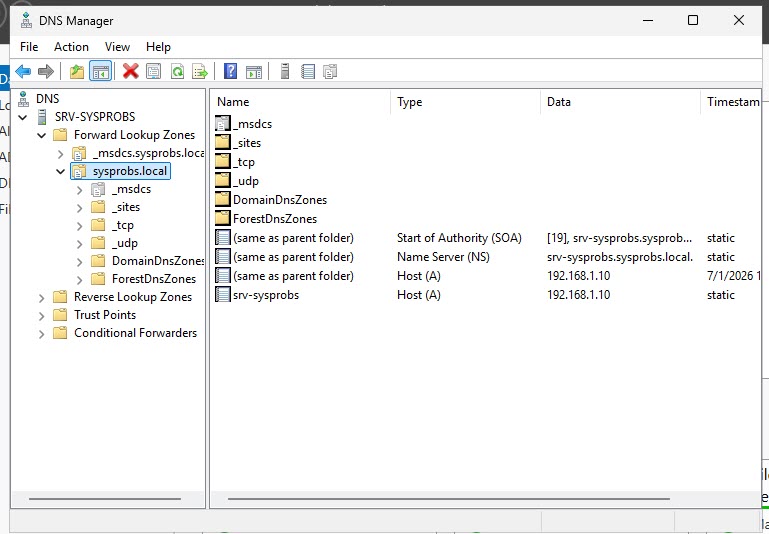
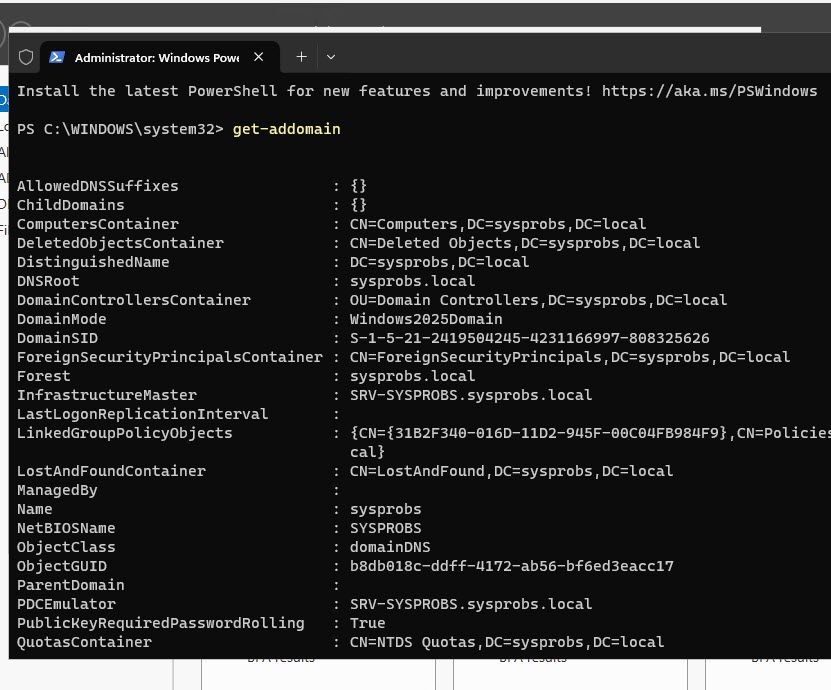
Run this quick check in PowerShell to confirm AD is responding:
powershellGet-ADDomainYou should see your domain info returned cleanly, including DomainMode, DNSRoot (sysprobs.local), PDCEmulator, and more.
Step 6: Join a Client VM to the Domain
Switch over to the Windows 11 client VM (CLIENT-01). First, change its DNS server to point to your DC’s IP:
- Preferred DNS: 192.168.1.10
Now ping the domain name to make sure DNS resolves:
textping sysprobs.localIf you get a reply from 192.168.1.10, DNS is working correctly.
Go to Settings > System > About > Domain or workgroup > Join a domain. Enter sysprobs.local.
Enter the domain admin credentials (SYSPROBS\Administrator and your password). Windows will confirm the domain join and ask you to restart.
After the reboot, log in with domain credentials. Back on the DC, open Active Directory Users and Computers > sysprobs.local > Computers. CLIENT-01 should appear there.
What to Watch Out For
- Static IP before promotion: I mentioned this already, but I’ve seen people skip it and spend an hour troubleshooting DNS failures that trace back to a DHCP address change on the DC.
- DNS pointing to itself: After promotion, the DC’s preferred DNS must point to 127.0.0.1 or its own IP (192.168.1.10). If it points to your router, domain authentication will break.
- Firewall between VMs: On Hyper-V internal switches, firewall rules are usually permissive enough, but if domain join fails with “domain not found,” check Windows Firewall on the DC. Ports 389 (LDAP), 636 (LDAPS), 88 (Kerberos), and 53 (DNS) need to be open.
- DSRM password: Don’t ignore this during setup. If you ever need to run an authoritative restore, you’ll want that password and you won’t remember it six months from now.
Pros and Cons of Running AD DS on Server 2025 in Hyper-V
Pros:
- Clean, fast setup with role installation and promotion in under 30 minutes
- Hyper-V snapshots give you an easy rollback point before and after promotion
- Windows Server 2025 includes improved Kerberos armoring and SMB signing by default
- Great for testing GPOs before pushing to production
Cons:
- Running a DC as a VM means a host OS crash can affect domain availability
- Snapshots and domain controllers can create USN rollback issues, so don’t restore old DC snapshots carelessly
- No built-in redundancy in a single-DC lab setup, which is fine for learning but not for production
The Verdict
If you’re setting up Active Directory on Windows Server 2025 for a lab, a small office, or just to learn the ropes, this setup works cleanly. The Hyper-V approach on Windows 11 is genuinely convenient: you get snapshots, easy networking, and the ability to spin up client VMs in minutes. Stick to the static IP first, point DNS to itself, and the rest of the wizard is mostly clicking Next.
For production, you’d want at least two domain controllers for redundancy, proper backup of the SYSVOL and NTDS.dit, and ideally a monitored DSRM password stored in a password vault.
FAQ
Q: Can I use Windows Server 2025 Evaluation for this lab setup?
Yes. Microsoft offers a 180-day evaluation ISO for Windows Server 2025. You can download it directly from Microsoft’s evaluation center. It’s fully functional for lab purposes and all the AD DS features work.
Q: What’s the difference between sysprobs.local and a public domain name for AD?
Using a .local suffix keeps your AD namespace completely internal and avoids conflicts with public DNS. The downside is it doesn’t work well with split-DNS setups if you later want to integrate cloud services. For a pure lab, .local is simpler.
Q: Can I promote a Server Core installation (no GUI) to a domain controller the same way?
Yes, but the GUI wizard isn’t available. You’d use PowerShell: Install-ADDSForest -DomainName "sysprobs.local" with the required parameters. It’s not complicated, but you need to be comfortable in PowerShell.
Q: What happens if the DC VM goes down, do clients lose access completely?
For authentication, yes. Domain logins will fail if the DC is unreachable and no cached credentials exist. File shares and apps that depend on Kerberos will also break. In a lab, that’s fine. In production, always run at least two DCs.
