The built-in Windows OS backup utility is a reliable tool without installing any third-party applications. It can backup the entire computer or selected items. Sometimes it becomes handy to restore the entire system from a crash or while moving to a different hardware/hard disk (like SSD). In this guide, let me show you how to restore a single file or folder from the full system image backup without restoring the entire disk.
When you don’t have any sources to recover a file/folder, the recent Windows 11/10 full system image backup can be used to recover the individual files and folder. Even though it is not straightforward as doing it from the control panel, we will use a tricky method to access our files and data from the Windows image backup.
After taking the full system backup to an external hard drive, different partition or the network share, you can see a few types of files as shown below.

The above system image backup can be easily restored with Windows 11 installation DVD. Now we will see how to open this backup data and access our required files and folders.
If you notice, you will find several VHD or VHDX files at the backup location. The Windows backup utility creates the virtual hard disk (VHDX) file for each partition we include in the backup process.
Steps to Open and Access Windows 11/10 System Image Backup VHD Files
As mentioned earlier, your Windows 11/10 backup will have VHD files. You need to locate them from the backup destination.
1) Open Computer Management by right-clicking My Computer.
2) Right click on Disk Management and select Attach VHD.

3) Browse the VHD/VHDX file from the Windows system image backup location. I suggest selecting the ‘Read Only’ option to keep backup data safe. If any of the files are modified then the particular system image backup may not be useful later.

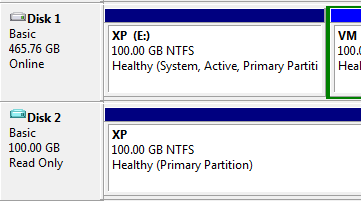
4) Now we have successfully mounted the VHD file from backup. The mounted VHD partition will appear like any other normal partition but without the write permission. You can browse the partition, and copy the required files/folder from it.

5) Once restored the required data, you can detach the VHD file from disk management. Right-click on the attached disk and select Detach VHD.

The latest Windows Operating Systems give the option to mount the VHDX files from the Windows explorer itself. Here is the mount option in Windows 11.
Related: How to open IMG file in Windows 11/10

We can use this feature to mount and access the VHD file from the backup location.
But you may get the below error/warning message while trying to mount the VHDX file from the explorer.
“Couldn’t Mount File- The disk image isn’t initialized, contains partitions that aren’t recognizable….” error.

This is just a warning message. To solve this issue and access the partition, visit the computer disk management snap-in. You will notice the additional partition without the drive letter. We need to assign a drive letter to access the partition.
Right click on the partition and select the “Change Drive Letter and Paths” option. Provide a drive letter and press OK.

Now the particular partition should be usable. We can browse it and recover the required files/folders from the Windows full system image backup.
The best part is we can use the same VHD files with other Windows OS machines to attach and browse the files and folders. VHDX is a Virtual Hard Disk format from Microsoft that is supported by most virtualization software. Therefore it can be used with other virtualization software like VMware, VirtualBox and Microsoft Hyper-V. Mounting VHD files without additional software is one of the good features is the latest Windows Operating Systems.
Hope this guide is useful to browse, locate and restore the important certain files/folders from the Windows full system image backup without doing the full restore process.


7 Comments
Seems there is something weird going on: When I select Read-only as suggested when I attach the vhd file, I get an uninitialized disk! I have to attach it Read-write once (getting it somehow modified, of course, at least the time stamp changes), then I detach it again. After that, Read-only mounting works as described. Don’t know what would happen if I tried to restore the backup…
Thank you so much for this!!!!
Virtual PC wasn’t working but this does!
Much appreciated!!
@Andre,
Glad to know. Thanks
Hi,
Ireally like the way you described this function and I am sure it will be an excellent help in many cases!
However, I had some trouble (lost my Oultook contacts and looking now for the pst file in my Image/vhd file). I followed your steps was abel to find the related vhd file by adding it, but it is shown not as a drive (with a drive letter) but only like a disk with the comment “not allocated”. Therefore nothing is shown in my windows explorer and as a locigal consequence I am unable to access my pst file, Any help would be very much appreciated! Thanks a lot in advance.
I have the same problem. Did you resolve it?
Neal
Great solution another way would be to use SyncToy. http://www.mmncs.com/2011/05/how-to-synchronize-two-folders-on-windows-7-with-synctoy-2-1-a-windows-7-backup-solution-2/
Works like a charm!
Took me a month to get to, and five minutes to do it. thanks to you!
Thanks!!