This article explains step by step method to install the older version of Mac OS X 10.5.5 in VMware on a Windows PC. If you are interested in learning the older version of Mac OS X Leopard to do some testing, then you can continue reading this article. This guide is only for testing purposes. Whoever doesn’t have the chance to buy Apple hardware with Mac OS can use this method for only learning purposes.
Note: This article originally published in August 2009
Installation is not that easy.
Installation is not as easy as inserting the CD and clicking ‘Next’ buttons or running some executable files. I wanted to install and learn Macintosh OS X on my Windows PC, so I searched on the internet for possibilities to have Mac OS by virtualization. But the results returned nothing beneficial than changing the Windows OS theme to Mac OS themes. Based on the other tips on several websites and trial and error by myself, I’m writing this method to install Mac on VMware on Windows PC.
As I said, earlier installation is not easy since the hardware platform requirement for both Operating Systems is different. To make the steps easy, and avoid the Mac installation from the beginning, we will import Mac OS pre-installed hard disk to VMware.
Software Requirements for Mac 10.5 on VMware
- Desktop virtualization software: VMware workstation 6 or latest.
You can download the VMware workstation from the VMware site here. Either you can try 30-day free evaluation version or buy the full version. - Mac OS X 10.5.5 Leopard VMware image download
Hardware Requirements:
Make sure after you installed the VMware workstation, you have a minimum of hardware resources that can be allocated to the Mac OS virtual machine.
RAM – 1GB
Hard Disk 15GB
Processor: Automatic allocation
Mac 10.5 on VMware Step by Steps
1) Install the VMware Workstation.
2) Download Mac OSX 10.5.5 Leopard VMware Hard disk image. (Approx Size – 1.9GB)
3) Extract the image to a folder (You need WinRAR for extraction, and the extracted file size is Approx 9.4GB). Make sure extraction is successful, and you get all VMware files as below
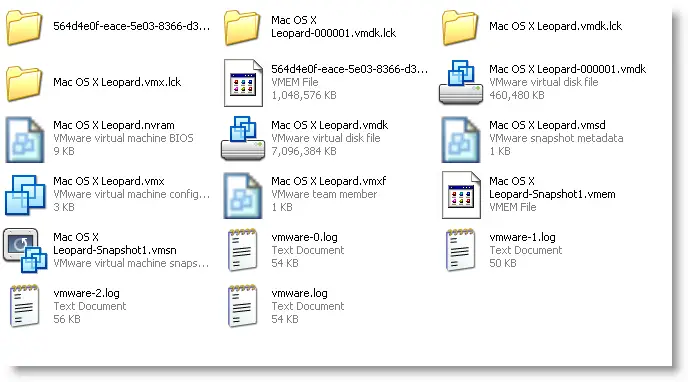
4) Start VMware Workstation and open the Mac OS X Leopard.vmx. (In VMware go to File – Open from the extracted place)
5) Once you opened the correct vmx files, you can see the configurations which already done on this image. The below screen is the default when you open it before powering on the virtual machine.
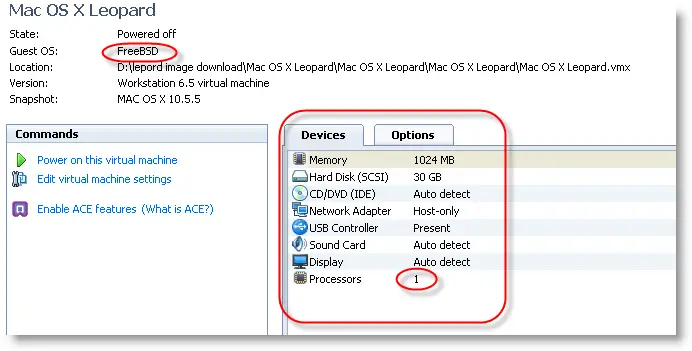
6) Make sure Guest OS is ‘FreeBSD’. Even if you have a Dual processor and have the option to select two processors in the VMware option, DO NOT change to two. Leave the Processors 1 only. Do not worry about Hard disk allocation of 30GB. You can increase the memory size if you have a memory resource on your computer.
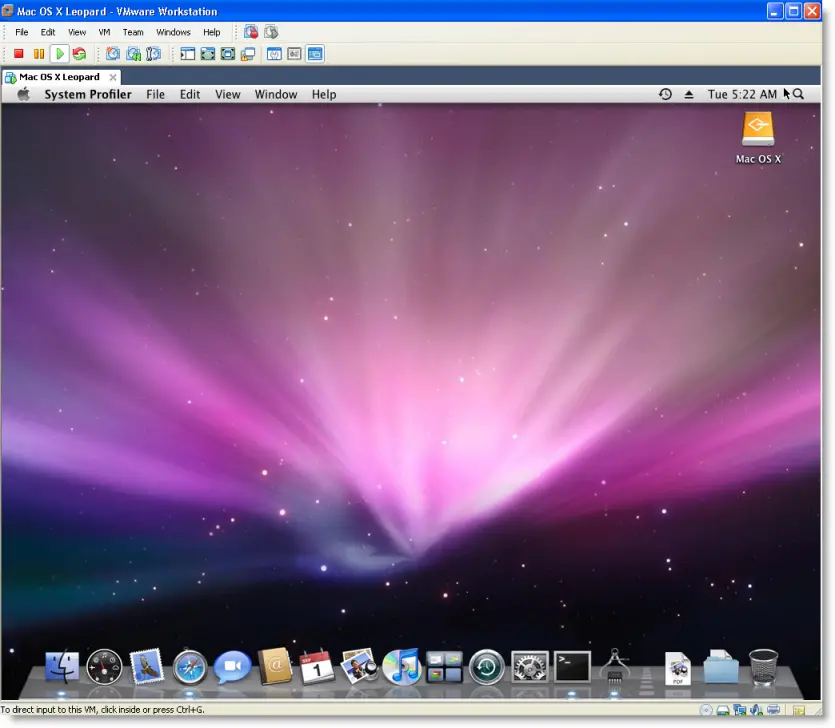
7) That’s it click ‘Power on this virtual machine’. Now you should be able to see Mac OS.
8) In case the Mac OS is stuck with the following welcome screen for a long time, try the below step.

You must disable ‘Intel Hardware Virtualization’ from your BIOS. Any time you enable or disable the Hardware virtualization setting in the BIOS; the computer should be completely powered off (cold restart) for 10 seconds before booting.
Read More about how to Disable or Enable Hardware Virtualization in BIOS
Now start the Mac on VMware again, this time it will work fine.
- Network
Somewhere I read that Network will not be working in Mac with VMware, but it works fine with this image. I tested ‘Bridged’ and ‘NAT’ networks in VMware both worked well.
- Mac Admin Password
This OS image has the Admin password, and the password is ‘password ‘.
Mac VMX File
For some reason, if you need to verify your virtual machine VMX file, you can check mine here.
We published many guides to install the latest Mac OS on Windows PC such as Windows 10, and 8.1 on our main page here, you can check to get the newest version of the guide.
If you like to use this VMware image on Oracle VirtualBox, check this guide.




“You must disable ‘Intel Hardware Virtualization’ from your BIOS”
I have found this not to be so, my processor supports Hardware Virtualization but am not able to disable this feature within my BIOS.
I am using VMware Workstation 7 and have found if “VMware Kernal Paravirtualization” is checked in the processor settings of the virtual machine settings I can boot past the welcome screen.
Hi Friends,
Try Google’s new OS Chrome in VMware workstation.
https://www.sysprobs.com/install-googles-os-chrome-virtual-machine
Hi i tried to build this setup but my keyboard and mouse are not working in the mac os please any advise me. Mouse and keyboard are (INTEX company)
Thanks in Advance
Hmm after Installing I find that the performance really sux 🙁 Anyway to improve this ?
At the moment I’m trying to install VMWARE tools, perhaps that will do something
Thanks for sharing
Unfortunately, we can’t do anything improve the performance in VMware workstation, other than disabling hardware virtualization in BIOS and increase RAM.
VMware tools can’t be installed in Mac. VMware does not support Mac as virtual machine. So FreeBSD VMware tools will not work with Mac anytime.
juan you need to be first set permission on CoreServices for read/write and secondly on SystemVersion.plist.now you can modify and save it.It works fine
it wont let me extract says no archives found. y?
It’s definitely something wrong with download, please check and download again.
When i extract the image, my computer just shuts down. no error messages.
one time i got a “Blue Screen Of Death”
i’ve got it.but when istart tve virtual machine, i got the welcome screen.
and when i use the vmx file yo show, it wont start at all.
Marvin, good to hear you extracted finally. You must disable Hardware Virtualization in motherboard BIOS. It is mentioned in same post and comments. Update me the status.
abilify side effect abilify bipolar mania abilify 10 mg abilify bipolar disorder abilify drug
Well done for getting this working!
But let’s add some honest here. This is barely unusable with its absolutely woeful performance. vmplayer isn’t the problem, I’ve run several OSes with in with both linux and vista as the host and guest, likewise with workstation. There’s something very odd about how slow the drive access is. It’s generally around 50-100x slower that native SSD access. I’ve never seen anything like it with vmware before. I think once the IO has been fixed, OS X in vmplayer will be a real option!
I published a post about increasing Mac Virtual Machines Screen resolution. It works well. Now you have option to increase screen resolution. Enjoy. Visit here https://www.sysprobs.com/increase-mac-os-virtual-machine-screen-resolution-virtualbox-vmware-player
When I start the Mac VM, it sits on the logo. My machine doesnt have virtualization technology.
this worked great, at first i was a bit skeptical. But i followed all the steps and it worked nicely. Thanks
yea i get stuck at the apple start up and i don’t have virtualization technology. so what do i need to do?
How do you install the VMware Tools in this thing? When I unzipped the tar ball, cd’ed to the install file and tried to compile it, it said this version of FreeBSD didn’t work with this OS.
@Jay Ly,
You can’t install VMware tools on this. These tools will work only with Mac OS X Virtual machines which we cant set up without editing VMX file.
Better check this post with working Mac with VMware tools,
https://www.sysprobs.com/steps-install-mac-snow-leopard-vmware-player-pre-installed-vmware-image
Thanks a ton for this blog post !!!! after browsing for hours and spending hell a lot of time in installing MAC OS on VMWare (most of which was futile due to hardware requirements) i came across your blog… really it was a Godsend 🙂
Great work dude ! keep it up 🙂 😀
@Ram, wow that was a great comment, thanks for it.
Hi,
I have followed all the steps. Can you please tell me how long mac logo should be displayed before the OS will start. It is taking so much time. And I am not sure how much time will it take.
Please help me!
Thanks
@Harpreet Singh,
It seems like it got stuck. Within two minutes you must see the Mac desktop.
Did you disable VT on your motherboard BIOS?
Great stuff man! It works on vmware server 2.0.2 as well! Great job!
@Matjaz,
Thanks, good to hear this works on vmware server also.
can you tell me the admin password please
its ‘password’ already mentioned in this post.
Hi Dinesh,
First of all i would like to thankyou for the valid information that you have provided to all.
i have one more query, could you plz let me know how to install vmware tools in MAC OS x 10.5.5
Thanks in Advance
GP
@Guruprasad,
Thanks for your comment.
I have not installed VMware tools ( it not official) on 10.5.5.
But this post shows to install on Snow Leopard 10.6
https://www.sysprobs.com/fresh-snow-leopard-1064-installation-vmware-player-3-intel-amd-pc
Which will give the more screen resolution,sound (different package) and VMware shared folders. Sound also should be installed separately. Again, I didn’t try these all on 10.5.5.
If you can try and let us know.
When i go in full screen mode the whole screen does not get utilized it shows the same size as it shows in windowed mode and in
middle and is covered by black strips i want to use it to full screen…
Can i do that??????
i tried to change resolution but there is just 1 option for that
@ Vishal Joisar,
you need to install VMware tools to get full screen.
GP
This is great… works excellent on my AMD Athlon x2 laptop!!!
@Axel,
Glad to know it works on AMD also.