

A static IP address is simply one that doesn’t change over time. It’s a permanent address assigned to a device connected to a network. Unlike a dynamic IP address usually provided by a DHCP (Dynamic Host Configuration Protocol) server, which may change over time, a static IP address stays fixed.
So now you might wonder why you need a static IP address. Static IPs allow your device to be reached at the same address by a remote access service like a VPN. They also ensure you have better network security and consistent availability. Mail, FTP, and web servers also benefit from it.

In this tutorial, we’ll show you the different methods of setting up a static IP address in Kali Linux 2023.1. But, of course, the methods are more or less the same for older or upcoming versions.
Let’s get started!
How to Set Static IP in Kali Linux
Now that you have some basic ideas about static IP addresses let’s move on to the main part of the article, which is how to set it up in Kali Linux.
First, we need to check the network we are currently connected to. We can check the default gateway by running this command:
$ ip r
The IP address you after ‘default via’ is the IP address that represents the default route or gateway. In our case, it’s 10.0.2.2.
For a more detailed version of your local IP addresses, you can use this command:
$ ip a
Now notice the highlighted line. It displays the assigned IP address to the eth0 network interface. This is the address that will change once we set up a static IP. So without further ado, let’s see the different methods to set that in Kali Linux.
CLI Method
We will show you two terminal methods to set static ip in Kali Linux.
By Editing the Network Interface File
First, we’ll cover how you can do the whole process from your terminal. First, open the /etc/network/interfaces file in your preferred text editor. We will use Nano for this tutorial. So the command will be as follows:
$ sudo nano /etc/network/interfacesThis should open the file in the nano editor. Add the following lines to the file:
auto eth0
iface eth0 inet static
address <desired IP address>
gateway <default gateway IP address>
Replace the placeholder texts with the appropriate values. In our example, it looks like this:

The first line is the network interface. We saw this when we used the ‘ip r’ command. Yours may be different and in the format of wlpXsY where X and Y are numbers.
The third line is where you set your static IP address. You need to make sure that the IP address you’re entering is available. And lastly, the default gateway.
Once you’re done with the file, save it with Ctrl + O. Then exit using Ctrl + X. When that’s done, run the below command to make the changes take effect:
$ sudo systemctl restart networking
You’re still not done. If you try to access the internet, it will fail. That’s because you haven’t yet set the Domain Name System. To do that, you need to tweak the /etc/resolv.conf. So first, open the file in a text editor. Or you can delete the file and create a new one.
To delete the file, use this command:
$ sudo rm /etc/resolv.confAfter that, create a new file in that same directory with the same name. You can do this by opening it in any file editor. To do that, run this command:
$ sudo nano /etc/resolv.confAfter the file opens, write the following line in the file
nameserver 8.8.8.8
Save the file and exit. Now test if it works by running this command:
$ ping google.com
If you see a similar output, it means that it’s working fine.
Read Also: Best Laptops for Ethical hackers/hacking.
Using ifconfig
Another way to do this is by utilizing the ifconfig command. First, set the IP address and the netmask with the following command:
$ sudo ifconfig eth0 <Your desired IP address> netmask 255.255.255.0In our case, it looks like this:

Once you’ve done that, now set the default gateway for the ethernet port zero by running this command:
$ sudo route add default gw <Default gateway address> eth0For us, it will be like this:

Now you only need to configure the DNS. You can do that with this command:
$ echo "nameserver 1.1.1.1" > /etc/resolv.conf
Remember to go root for this command.
GUI Method
If you’re uncomfortable using the terminal in Linux, you can follow this method instead.
You will find all the options at the top right corner of your home window. At the very left is the network settings icon. Right-click on the icon.

From the drop-down menu, choose Edit Connections.

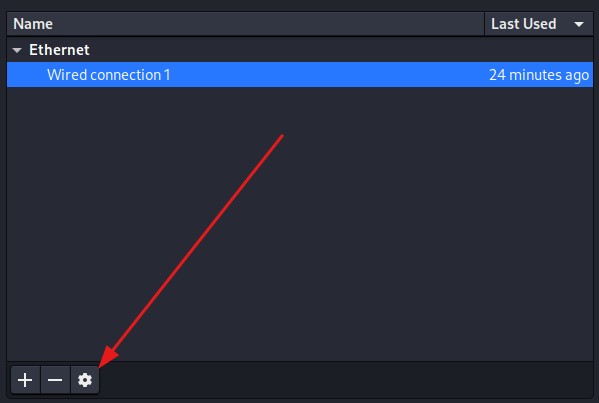
A window will appear. Now choose the connection that you want to configure. In this case, we only have one option called Wired Connection 1, so we will choose that.

Left-click on the connection name and press the setting icon at the bottom
In the new window, click on the tab that says IPv4 Settings.

Click on the Method drop-down menu, and choose Manual.

Next, tap the Add button to add a new IP address.

Now is the most important part. You need to set an IP address, a Netmask, and a Gateway. One by one, type in the correct values.

The green color indicates that the values we entered are available. Otherwise, it would be highlighted in red. After you’re finished, press the Save button.

Now you need to restart your device. You can do that with this command:
$ sudo rebootSo now, if you recheck the current IP address, it should be changed to the one you set.

This article shows you how to set static IP Kali Linux. We’ve covered both the CLI and GUI method so that you can choose the one suitable for you. Please let us know in the comments below if you have any questions.
If you’d like to start your journey as an Ethical Hacker, we have 10 tips to enhance your Linux experience as a hacker. Remember to check it out.