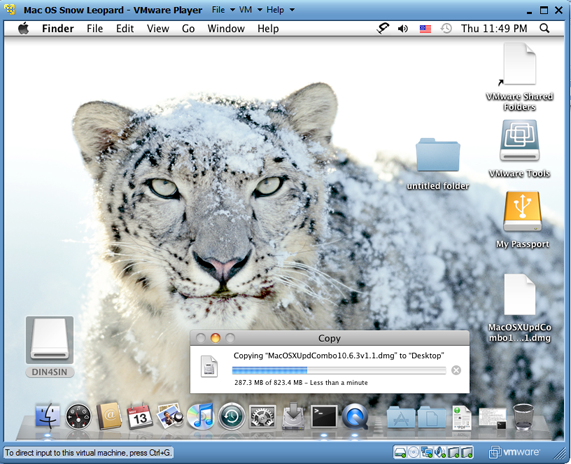
Everybody likes to work with Mac OS X on a normal computer without buying the Mac Hardware. If you are one of them, you reached the correct place. This article explains how to install Mac OS X 10.5.5 Leopard on VirtualBox. We do not need to buy any additional hardware or software for this purpose. This method is only for testing purpose. Do not use as a permanent and production solution.
Mac OS X 10.5.5 installation DVD is not required and this method will work with AMD and Intel processor X 86 computers as well.
If you like to try this VMware preinstalled image on VMware workstation, try this method which we published earlier.

I wanted to try the same Mac OS X image on VirtualBox but faced below two issues.
1) The VMware Image did not boot.
2) Mac OS X admin password did not work once it booted.
I will be explaining how to fix the above issues and install properly in the below steps.
Note: This post originally published back in year 2010 with the older version of VirtualBox and macOS. If you have the latest computer hardware, VirtualBox and macOS, then you can find the updated guides in our this page.
Required Products for Mac OS X 10.5.5 installation.
- Oracle VirtualBox
- Mac OS X 10.5.5 VMware image
- Intel and AMD processor virtualization utility
Installation Steps
1) Download the Mac OS X VMware image here. ( it’s a torrent download & size is approx 1.9 GB)
2) Extract the downloaded image by WinRar.
3) Now, Open VirtualBox. Create a new virtual machine with the following configuration.
Operating System – BSD
Version – FreeBSD

MotherBoard Extended Features – Select Enable IO APIC,

Processor Extended Features –Select Enable PAE/NX

Acceleration Hardware Virtualization – Select Enable VT-x/AMD-V

If you can’t see Acceleration tab under system settings, it means hardware virtualization is not enabled on motherboard BIOS. This Mac OS X VMware image works only with hardware virtualization enabled computers.
Allocate memory – Minimum 1GB
Hard disk – Select Existing hard disk and add extracted Mac OS X VMDK file. You can see the hard disk size as 30GB. When adding the Mac VMDK file, attach as ICH6 or PIIX4 only. If you select PIIX3, Mac will hang with booting screen.

Read more here how to add vmdk files in VirtualBox as a hard disk.
4) Here we go; we are ready to start Mac 10.5 VM. Don’t start the virtual machine, because it will not work now. After configured following settings, close VirtualBox application completely and change the XML file. Add the string mentioned in the below step.
5) VirtualBox creates and saves virtual machine’s configurations in an XML file. Normally location is user profile ->.Virtualbox -> machines -> machine name.
Edit the XML file and add
<ExtraDataItem name=”VBoxInternal2/SupportExtHwProfile” value=”on” />
My Mac OS X XML file looks like below,
If you are facing difficulty to start Mac OS X after above changes, open the XML file and make sure the added line exists. Because sometimes when the VirtualBox services are running, the XML change will not be saved properly.
6) If the Mac OS virtual machine booting screen stuck as below, I’m sure something wrong with hardware virtualization.

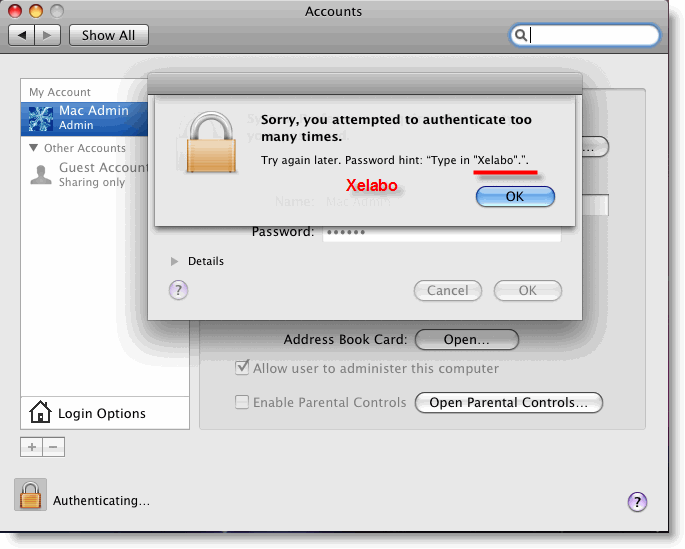
7) Mac admin password with for Mac OS X Vmware image is Xelabo, as hinted below.

8) Now start the virtual machine, I’m sure you can see a working Mac OS X 10.5.5 leopard on VirtualBox.
9) As you could see in the above screen, the network is working fine within the image. I can ping to my host Windows computer from Mac OS X. I set up ‘Host-only’ network.
To use this method, the hardware virtualization in BIOS and Acceleration Hardware Virtualization – Enable VT-x/AMD-V in VirtualBox should be enabled.
You can verify the enabled hardware virtualization in motherboard BIOS here.
That’s it. Installation is done. Unfortunately, we can’t install the VirtualBox guest additions or change the screen resolutions.
Problems and Solutions
I demonstrated these installation steps on my PC which was with the following configuration (Remember: it was done in 2010).
- Intel Core2duo 2.66GHz
- 3GB RAM
- P35 Intel Chipset.
If the VM stuck with Mac logo (without loading arrows), then check the following settings.
- Enable IO APIC and VT-x
- Enable PAE/NX, make processors numbers 1
- You can Try Enabling Nested Paging. (it worked for me without enabling it, but one user said it worked for him after enabled)
- IDE Controller ICH6
- Close VirtualBox completely and open the XML file to make sure extra string is there.
- Still, it hangs? Shutdown the virtual machine and restart several times. It will work (Don’t ask me why).
If stuck with Mac logo (with loading arrows), then check the following settings
- Enable VT-x
- Check BIOS whether hardware virtualization is enabled.
- Run virtualization detecting tools to make sure that host OS is detecting hardware virtualization. Because in some PCs, even when VT is enabled in BIOS the OS will not detect.
- Close VirtualBox completely and check the XML.
As this guide was done with the older versions, you can use the same VMware preinstalled image of Mac OS 10.5.5 without modifying ting the XML file on latest Oracle VirtualBox. It is better to virtualize and use the latest version of macOS rather than trying 10-year-old product except you have some specific reason for that.


267 Comments
Is it possible to get “Mouse Pointer Integration” or install VBoxAdditions on MAC using above image?
I am on win host.
Jack, VirtualBox guest additions are not available for Mac OS X, since they don’t support officially.
Thanks for this, I followed yours and Edgar Ps tips to get this working. To answer an earlier question about setting the -legacy flag, this is done when you start the VM, and press a key to stop the boot-up.
You then get a prompt, and you can enter parameters, like Edgar P did with graphics mode and legacy.
PLESASE TELL ME YOUR PAYPAL
I WANNA DONATE FOR YOUUU!!!!
PLEASEEE
Hi David,
If you are not spammer or hacker (sorry to say), thanks very much your message. Its like I already got 1000$ donation from you 😉
Unfortunately I don’t have PayPal account to receive the money.
Be my reader always. Thats enough.
Omg i cant attach that sting there….
can anyone help me pleaseee?
Make sure VirtualBox program is closed completely and open the XML file in Wordpad (if its Windows) then add the string.
Save and double check before start the VirtualBox again.
Omg:D
BE SURE THAT I will read your posts! and blogs…
and thanls for helping im gonna check it tonight…
wow… its still not working… dunno why…
this is the sting:
?
Can you send me that sting again cause that is not working, this:
ExtraDataItem name=”VBoxInternal2/SupportExtHwProfile” value=”on” /
THANKSSSSS ITS WORKINGGGGG
I HAD TO MANUALLY TYPE IN THE LETTERS AND NOW ITS WORKING:d
THANKSSSS
Thanks this is working great.
Did anyone ever get this working on virtualbox 4.0.4? i cannot get past the spinning logo or i get an error if i type in -v of BSD root:.Disk1s2, major 14, minor 3.
if i put that string in wordpad/notepad it gives me an error and will not start virtualbox. Very frustrating i did want to get this to work also.
Hi Curtis,
The steps are slightly different in 4.X than 3.X virtualbox. You’ll need to download notepad++ (it’s free!) to edit the vmname.vbox file located in the VirtualBox VMs directory on your windows 7 machine. For example my OSX vm is called “MAC OSX” and the file I need to edit is ‘C:\Users\Nathan\VirtualBox VMs\Mac OSX\MAC OSX.vbox’
Install notepad++, then find your .vbox file (also make sure VirtualBox is closed). Right click on it and select “Edit with Notepad++”
Find the tag and add
(Make sure the formatting is the same as the tag above it as XML is very strict about it.)
Now in Notepad++, click on Encoding on the top menu bar and select “Encode in UTF-8” – Make sure none of the characters you copied in didn’t get jumbled (my quotes did, I had to re-enter them manually) then click save. You shouldn’t receive an error the next time you open virtualbox now.
After you open the
gech, xml formatting screwed up the post.
Where I said “find the tag and add” I was referring to the – ExtraDataItem name=”VBoxInternal2/SupportExtHwProfile” value=”on”/ from Dinesh’s post.
for me, its crossing grey booting screen. after that, its stucks with the dialog box displayingr “Select a destination to install?”. but its not displaying any drive or file system to install it…
i installed it sucessfully… but its not detecting my keyboard…..
senthil,
This method goes with pre installed image, So I’m not sure how it started the installation and now keyboard is not working.
Try to do it again with pre installed image.
It works gr8..just create a Mac OS X machine and give in the boot option -legacy within first 5 secs..
Thanks. This works!!!
I got it to work had to change it from BSd to MAC OS and it worked fine after that. ty good tutorial.
hi when i want install leopard on virtualbox v4 i gave “logerror” how can i fix it.and how can i edit xml.
i cant do step 4-5
(4) Here we go; we are ready to start Mac on VirtualBox. Don’t start the virtual machine, because it will not work now. After configured following settings, close VirtualBox application completely and change the XML file. Add the string mentioned in below step.
5) VirtualBox creates and saves virtual machine’s configurations in a XML file. Normally location is user profile -> .Virtualbox -> machines -> machine name.)
when o go to the vb folder, its not there… please
HELPPPPPPPPPPPPPP
So what do I do if no acceleration tab shows up under system?
Because it seems thats the only thing I need and its not there…
Worked for me… running on core i7 and AMD Phenom with same modifications. Also got the resolution updated using method 2 in the info found here:
https://sysprobs.com/increase-mac-os-virtual-machine-screen-resolution-virtualbox-vmware-player
Forgot to say… I did need the -legacy flag.
Worked for me on Natty. Virtualbox.
VT-x/AMD-V, PAE/NX, 128mb vram, 3d enabled,
Very fast: the password for Mac Admin is NOT Xelabo .
Virtual Box 4.0.6
Remember to say use disk on storage after you chose the disk, otherways it doesn’t work.
Nat network works.
Thanks.
Hi
I followed the instructions on the site. I have virtualbox version 3.2., and when I went and started the system, this came up on the screen:
“FATAL: No bootable medium found’
What am I supposed 2 do?
The password for Mac Admin is NOT Xelabo.
Please post the correct password!
Everything works as advertised.
On VBox 4.0.8
use the torrent link provided same as the one mentioned above. https://sysprobs.com/wp-content/uploads/2009/08/mac_os_x_leopard_1055_vmware_image4798016tpb.torrent
instead of free bsd use mac os x and server and remove efi boot option.
and when the 5 second count down is happening hit any key and enter -legacy and hit enter
thats all
Thanks!!!!!!!!!! It worked fine to me.
hi all…. i have some problems. i follow some of the guide’s described in this blog but none of them work.
first i dont have acceleration in VB http://i1205.photobucket.com/albums/bb438/thehardshutter/Cattura.png
thats why i think i cant see the VT in bios.
can i have some help pls…!!!!
thanks in advance!!!!