When I migrated my home computer to new hardware with Windows 11, the VirtualBox VMs started working too slow. They are completely unusable. Even though the new hardware configuration is more powerful than the old PC, it was a real shock when the virtual machines started acting very slow suddenly.
Technically the existing virtual machines should work well on new hardware. I had no doubts about the processor or RAM support since I installed the latest version of the Oracle VirtualBox.
I had every doubt about the Windows 11 Operating System only. Since it was a fresh installation without much modification, I was unsure where to start the troubleshooting.
In this guide, let me show the steps you need to take if you experience a similar issue with painful slow VMs on VirtualBox with Windows 11 host. You can use the same methods on Windows 10 computers also.
Why VMs Working too Slow on VirtualBox with Windows 11?
The main reason is the Hyper-V feature on the Windows OS. Even if you haven’t installed the Hyper-V feature or already removed it (installed earlier) from the control panel, you may experience extremely slow virtual machines in VirtualBox. Follow the below steps to fix it and make it work like usual.
How to Identify that the VM is struggling to work on Windows 11 Host?
- Obviously, the VM boot will be too slow. Sometimes you will not get the desktop screen even after 10 minutes.
- You will notice a green turtle icon on the virtual machine console. This indicates that there is a performance issue for the VM.
Reason for the Slow VirtualBox VMs in Windows 11
The Microsoft Hyper-V feature or related services using virtualization technology (VT-x) on your computer. VT-x is a critical feature the VirtualBox uses to run the VMs at optimal speed. When the Windows services occupy this feature, VirtualBox can’t use it.
Hyper-V and VirtualBox can’t access the VT-x (Virtualization technology) simultaneously on a computer. We discussed a similar problem earlier here.
How to Fix Extremely Slow VirtualBox VMs – Windows 11/10 Host
1) Uninstall the Hyper-V feature
If you installed Hyper-V, Sandbox, Docker features or anything related to Hyper-V recently, you need to uninstall them.
These features and VirtualBox can’t work together well on a computer. Microsoft services like Hyper-V always access the VT-x technology first while the host OS boots up; hence, VirtualBox can’t access them later.
Windows 11 and Windows 10 have slightly different names for these features. Make sure to find the correct one and remove them.
Visit Control Panel -> Programs and Features. Click on the ‘Turn Windows features on or off’ option to remove the Hyper-V and related features.
Make sure to untick Hyper-V services, Virtual Machine Platform, Hypervisor Platform and Windows Sandbox.
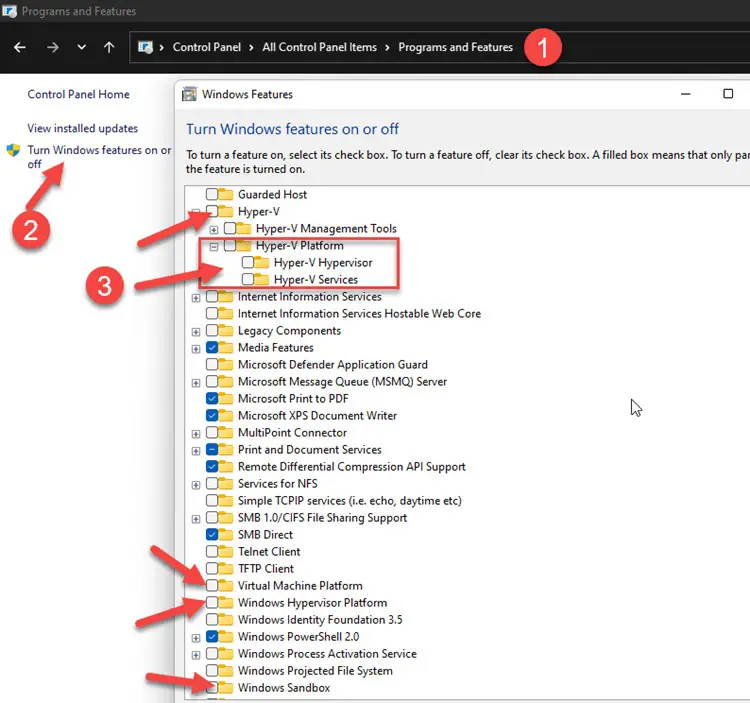
Press OK to remove the features.
You need to restart the computer to take effect.
Once the computer is rebooted, power on the virtual machines in VirtualBox and see whether they work at the normal speed, also, the green turtle icon should not appear in the VM console.
If this doesn’t help, go to the next step.
In my example, it was a fresh installation of Windows 11 on brand new hardware. I did not enable Hyper-V or any extra services. So, in the control panel, I did not see these options selected, yet the VMs worked very slowly in VirtualBox.
2) Clean Uninstallation of Hyper-V by Command Prompt
Several feedbacks are available online to perform a clean removal of Hyper-V features from the command prompt.
Open the command prompt as administrator and execute the following commands.
bcdedit /set hypervisorlaunchtype offand DISM command to remove the feature.
DISM /Online /Disable-Feature:Microsoft-Hyper-VShut down the computer after the above commands and wait for 20 seconds. Then switch on the computer to see the difference.
Technically, this step did not help me either. The above commands returned a successful message at the end. Still, the virtual machines in VirtualBox worked exceptionally slow.
To verify whether this is affecting only the existing virtual machines, I created a new virtual machine and started installing Windows 10 on it. The process was painfully slow, and I could not continue further. Because the new VM also started with the green turtle icon.
If none of the above steps helps you, the final option is about the device and credential guard in Windows Defender. Also, the core isolation option in Windows 11 security.
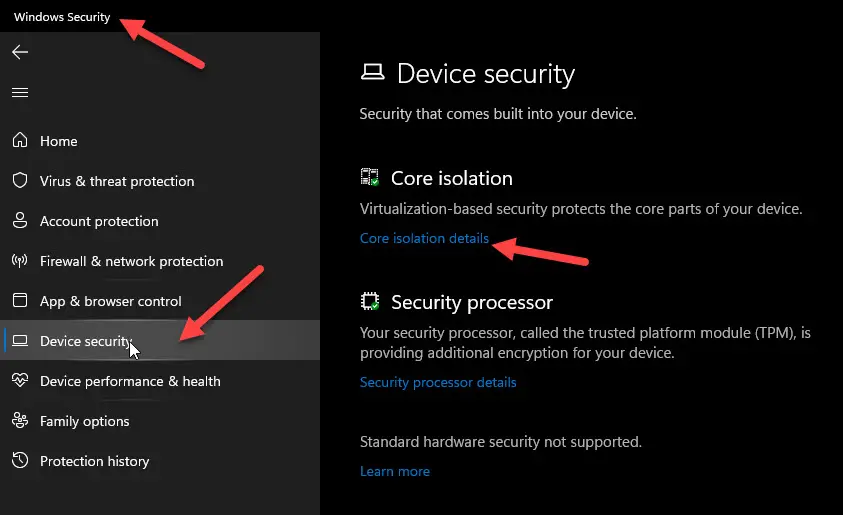
3) Disable the Core isolation option in Windows Defender
Before disabling the device or credential guard in Windows defender, disable the Core isolation.
It is one of the virtualization-based security options that use the VT-x of the Windows computer. Even though we uninstalled the Hyper-V feature completely from the PC, the VirtualBox VMs could work very slowly if the core isolation option is still active.
- Open the Windows security app (Search for security & open Windows defender security)
- Select ‘Device security’ and ‘Core isolation details.’
- Switch off the ‘Memory integrity’ option. This will require the reboot of the computer.
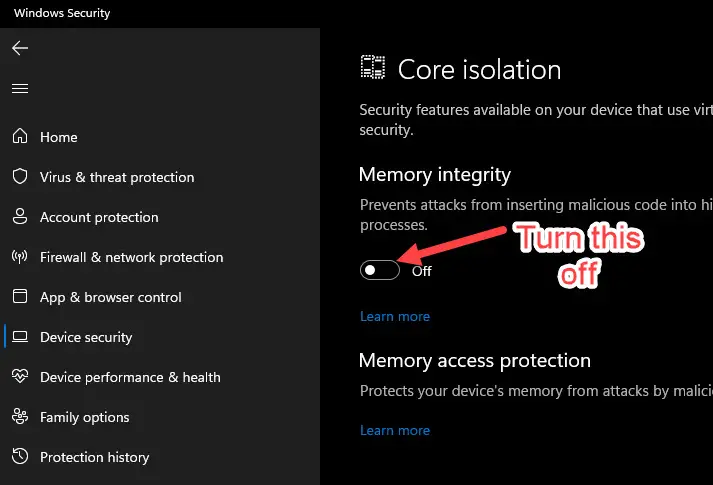
My VirtualBox virtual machines started working well by disabling this option and rebooting the computer. Also, the green turtle symbol disappeared the ‘V’ symbol returned like normal. That is a clear sign that the virtual machines are using the proper VT-x feature of the computer hardware.
4) Disable Device and Credential Guard
Since disabling Core isolation in Windows defender solved my issue, I did not need to try these solutions. Also, I believe this method may not apply to your Windows 11 PC.
If you have Windows 10, you may need to look into these options.
The device and credential guards are slightly complicated options that can be enabled by Group policy, registry, HVCI and Windows Defender readiness tool. If these options are not enabled on your computer by any of these tools, then definitely, these will not create slow VM issues on VirtualBox.
If you still face the issue and need to disable these options, check out the below guides.


Hello.
I thank you so much sir. This finally helped my VM to work smoothly.
Thank you so much sir. The third step worked for me as well. I had enabled it by mistake
Thank you for your help! Turning off memory integrity made all the difference.
Yes indeed, your process fixed the VMs. Thank you, no one else seemed to know how to solve.
However a new problem was created. I now cannot access any network drives on a NAS either directly or by using apps that have their data on the NAS.
My PC (My Computer) takes many minutes just to open, probably because of the inaccessible network locations.
I took the easy route troubleshooting by undoing just step 3, restoring the Core isolation setting. That fixed the NW Drive situation but again crippled VirtualBox. VB is so bad that WinXP refused to install until your fix, which then made it install & run amazingly well.
I’m running Win11 Pro 22H2 on a new LG gram 17Z90Q-K.ADS9U1.
Maybe I just have to go thru the steps on turning the Core isolation on & off when using VB, unless you may have a fix?
Thanks a lot, I was cleard.
How does VMware manage to work with no issues and Hyper-V turned on, but Virtualbox has not been able to do this?
I never comment but you just fixed my slow VM problem on which I was for 10 hours now. I was about to go for a Azure Cloud VM.
Thank you very much sir.